
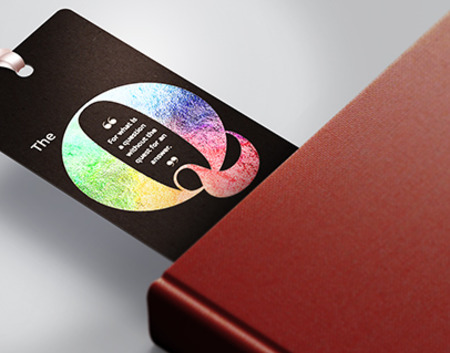

Create a distinct bookmark for your customer’s reading habit.
- Create metallic effects in different colors
- Complement the extra shine w/ spot UV printing
- Available in the standard 2” x 6” size
- Printed on durable 16 pt. cardstock
- Strings not included
Metallic Bookmark Printing That Lets Your Brand Stand Out & Shine
Print metallic bookmarks for your customers to take home after a book launch, reading, or sale. Your brand becomes a dazzling part of their favorite past time, whether they’re catching up on reading or closing the last chapter.
Distinct, Daring, and Durable
A metallic custom bookmark instantly shines and sticks out. Lighter colors no longer appear pale next to darker shades. The foil-like effect gives darker colors a sleek, elegant touch.
All metal bookmarks are printed on 16 pt. cardstock. Its premium weight and thickness give your design a luxurious appearance.
Choose from two coating options that elevate the elegance of your custom bookmark design. Keep the surface uncoated to complement the metallic accent’s glimmer or add high gloss UV coating for a smooth, shiny background.
You can also add a 1/8" hole at the top center to add your own tassel.
Set the Right Size
Choose from three standard sizes for bookmarks.
- 2" x 3.5" is ideal for small, compact designs.
- 2" x 4" is our medium-sized option. Perfect for a few important details on your company.
- 2" x 6" is the longest and most popular size available. Your design can strike a balance between words and images.
Give Extra Emphasis
Spot UV draws a customer’s attention to certain elements, such as your logo or slogan. Words or images are given a smooth, shiny gloss that complements the metallic areas.
Print metallic bookmarks today for your next big book event. Not sure how to begin? Download one of our templates as a guide. Our print experts are also available to answer all your questions.
Q&A
How should I prepare my metal bookmark for printing?
You will submit two files for metallic bookmark printing orders: the CMYK file and the silver foil mask file. On the mask file, mark the sections for metallic printing with 100% K or black. Mark the non-metallic areas with white.
What should I keep in mind while creating my custom bookmark?
Follow these tips to create a well-designed metal bookmark:
- Text with metallic printing shouldn’t be too small or thin. Keep the font size above 12 and use Sans Serif fonts for readability.
- The metallic, foil-like effect works best on light colors. Apply spot UV printing or have a high gloss UV surface for darker elements.
When can I expect my metallic bookmarks order?
Custom bookmark printing takes 7 business days. After those 7 days, your order will be shipped to the indicated address. To find out when you can expect the order, select “Get Estimate” on the online calculator and input your ZIP code.
Metallic Printing File Requirements
Keep in mind the following file requirements below as you create a design using our downloadable templates:
- The font size should be a minimum of 7 or 8 points. Avoid printing small text or fine lines in metallic.
- Border and stroke must be more than 1.5 points.
- Images and artwork should be at least 300 DPI.
- All files should be in CMYK color mode.
How to Prepare Your Design for Metallic Printing
- Apply metallic printing on lighter colors. The effect won’t be as apparent in darker colors.
- Create two layers to distinguish the elements printed in ink from the elements with metallic printing. Both files should have the same size.
- The regular CMYK layer shows which elements are printed in ink. Apply 15% K on the area that will be printed in metallic color.
- The metallic printing layer only shows the elements that will appear as metallic. The element(s) that will be printed in metallic colors should have the same location as seen on the CMYK layer. Apply 100% K on the metallic area and white on the areas with no metallic printing.
The images below show the difference between the two layers:


- Alignment is crucial to the file preparation process. The CMYK and metallic printing layers should both have the same size. Common elements must be in the same position on both layers.
- Check for a white "halo" around the knockout area or where two colors overlap on the layer. To prevent this effect on the CMYK layer, grow or stroke the metallic area in mask by 1 point. This allows the metallic silver to blend with the CMYK area, which reduces the appearance of a halo. Alternatively, you can add more color to the knockout area to reduce the halo effect.
How to Add Spot UV Elements to Your Artwork
You can also print artwork with both metallic and spot UV elements.
This requires a third layer that shows the spot UV areas, which you can create through the following steps:
- Apply a 100% K to the areas with spot UV printing.
- Make sure the spot UV layer has the exact same size as the CMYK and metallic printing layers.
- On the CMYK layer, add a 1/16” gap between the spot UV and metallic areas.
