
How to Draw Flowers in Illustrator
Drawing graphics in Illustrator can be a lot of fun, if you know which tools to use and how to correctly operate them. If flowers are what you need for your design, you can choose from a few looks and techniques. Try each one out and choose the one that provides the unique flower look you need for posters, web pages, booklet printing, and more.
Vector Flower
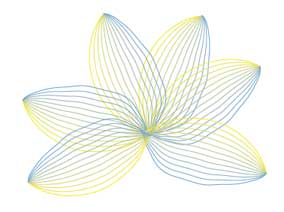
Step #1 Create a flower petal.
After you have opened Illustrator, make two stroke paths. Make one blue and one yellow, and make them touch at the ends and curve out like a flower petal.

Step #2 Blend the lines to fill your petals.
Go to Object>Blend>Blend Options and specify 10 steps.
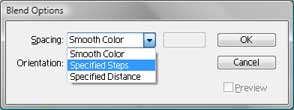
Select the two petal paths by holding down Shift and clicking each path. Then go to Object>Blend>Make.

Step #3 Duplicate the petals.
Simply copy and past the petals and arrange them to form a petal.
Step #4 Create a stem.
Make a line for the stem and blend, specifying eight steps.
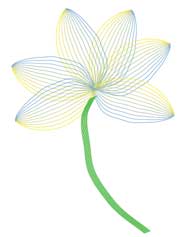
Step #5 Make a leaf.
Make the leaf in two parts, top and bottom. Make an arc for one path and a straight line for the second. Specify 5 steps.
Now do the same for the bottom of the leaf.

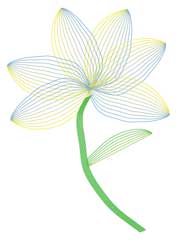
Now move the two petal parts together. Your flower should look airy and unique. Try all kinds of color and placement effects for some variation.

3D-like flower
Step #1 Make two spirals.
Using the Spiral tool (located within the Line Tools), create a spiral and select a color for your base stroke. Make a second spiral in a coordinating color. Be sure to select a heavy stroke weight, such as 6 pt, and make sure the fill is set to none.

Step #2 Place the spirals.
Lay the first spiral with the outside end at the top. The second spiral should be at least twice the size and laying down like a snail. The spirals should be overlapping slightly with the large spiral above the smaller one.

Step #3 Fill the spirals with color.
Select the Blend tool from the Toolbox. Click on the smaller spiral first and then the larger one. The program will automatically fill the spirals with a gradient blend using the colors you chose for the spirals.

Step #4 Add simple green leaves and spiral vines.
Create an arc for a leaf using the Arc tool. Make the top and bottom strokes of the leaf a different color of green.

Fill the leaf with color as you did the spiral using the Blend tool.

Copy and paste the leaf, and add the leaves to the flower. Use the Rotate tool to turn the leaves and select Object>Arrange>Send to Back to place any of the leaves behind the flower petals.

Daisy
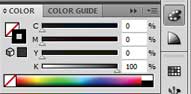
Step #1 Create the right settings.
Before you get started, turn off your fill or set it to white. Set the stroke color to black.
Step #2 Draw a polygon.
Use the polygon tool from the tool palette to make a polygon shape.

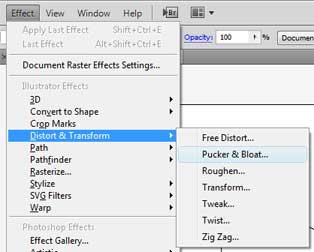
Step #3 Create the flower shape.
From top menu bar, select Effect>Distort&Transform>Pucker& Bloat.
Slide the transform slider to the right until you reach the setting you like. Try 78%.
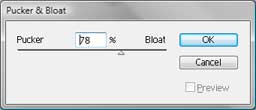
Your petal outline should appear.

Step #4 Add some color and some details.
Use some gradients. Yellow to orange looks nice.

Now add a circle in the middle and fill it with a gradient brown.

Add a green line for a stem and you have a simple, lovely daisy.

These flowers will work for any product from web pages to brochure printing. With poster printing, you can use one flower on a really large scale or more of them on a smaller scale. Play with these designs and you may just discover your own.
